Setting several SharePoint sites read only

Setting a SharePoint site collection is quite an easy task. Setting several sites and subsites read only is not. There’s no cmdlet available to set one or more SharePoint sites read only.

For me read only means that all the permissions that exist are being put to “Read”. So here’s the script that does all the magic:

There are 3 parameters: The LogFilePath (for instance c:\temp\log.txt) where the old permissions are being written to for later consultation. The SiteUrl of the SharePoint site collection where the sites are located. And the exclusionSitesTitles is an array of titles of sites that should not be put read only. You can also change these to URLs, but then you have to edit the AllWebs line:

$webs = $site.AllWebs | ?{-not ($exclusionSitesTitles -contains $_.Title)}

Param (
  [Parameter(Mandatory=$True, Position=0)]
  [string]$LogFilePath,

  [Parameter(Mandatory=$True, Position=1)]
  [string]$SiteUrl,

  [Parameter(Mandatory=$True, Position=2)]
  [string[]]$exclusionSitesTitles
)

[System.Reflection.Assembly]::LoadWithPartialName("Microsoft.SharePoint")
$site = New-Object Microsoft.SharePoint.SPSite($siteUrl)
$webs = $site.AllWebs | ?{-not ($exclusionSitesTitles -contains $_.Title)}

function checkPermissions([Microsoft.SharePoint.SPRoleAssignmentCollection]$roles)
{
	$roles | Out-File -Append -FilePath $logfilepath
	$roles | %{
		if($_.RoleDefinitionBindings.Count -eq 1 -and $_.RoleDefinitionBindings.Contains($guestPermission))
		{
			$_.RoleDefinitionBindings.RemoveAll();
		}
		else
		{
			$_.RoleDefinitionBindings.RemoveAll();
			$_.RoleDefinitionBindings.Add($readPermission);
		}
		$_.Update();
	}
}

function checkLists($web)
{
	$web.Lists | %{
		if($_.HasUniqueRoleAssignments)
		{
			checkPermissions($_.RoleAssignments)
		}
	}
}

$webs | %{
	$readPermission = $_.RoleDefinitions.GetByType([Microsoft.SharePoint.SPRoleType]::Reader);
	$guestPermission = $_.RoleDefinitions.GetByType([Microsoft.SharePoint.SPRoleType]::Guest);
	$_.Url | Out-File -Append -FilePath $logfilepath
	if($_.HasUniqueRoleAssignments)
	{
		checkPermissions($_.RoleAssignments)
	}
	checkLists($_)
	$_.Dispose();
}
$site.Dispose();
Working with SPWeb’s Propertybag

The most common scenario for working with site settings is using the site’s propertybag. When you look at the SPWeb’s members, you might notice the following properties and methods:

It’s important to note that the methods of SPWeb that handle properties, reflect upon the SPWeb.AllProperties property and not on the SPWeb.Properties property. Only the AllProperties property should be used, the Properties property is added to SharePoint 2010 in order to provide backwards compatibility with older applications.

A big improvement of the SPWeb.AllProperties is that instead of a StringDictionary, you get a HashTable where you can store objects instead of strings. There is a restriction here though: Only String, INT, and DateTime datatypes can be used as the value in AllProperties.

An example of using SPWeb properties in PowerShell, the same can be used in C#:

$web = Get-SPWeb http://sharepoint
$web.AddProperty("SPWebObjectKey", $web)
$web.Update()
$tempWeb = $web.GetProperty("SPWebObjectKey")
Write-Host $tempWeb.Url

This outputs to http://sharepoint

Now that we have used our property and no longer need it, it’s time to delete it:

$web.DeleteProperty("SPWebObjectKey")
$web.Update()

Creating a new SharePoint site programmatically

Creating sites through code adds the ability to package them in .wsp files. When developed applications have to be pushed to a production environment, recreating all created sites manually can be a cumbersome task. By using code, we’re able to automate this task.

I created a new Empty SharePoint project and added an event receiver. Next, uncomment both FeatureActivated and FeatureDeactivating code blocks. Open up your code file and add the following variables:

const int LOCALE_ID = 1033;
const string SITE_NAME = "Site";
const string SITE_TITLE = "Site Title";
const string SITE_DESCRIPTION = "This is your new site!";
const string SITE_TEMPLATE = "STS#1";

The variable names are self-explanatory. There’s a complete list available with all the IDs.

The following line will create the new SharePoint site:

SPContext.Current.Web.Webs.Add(SITE_NAME, SITE_TITLE, SITE_DESCRIPTION, LOCALE_ID, oWebTemplate, false, false);

To clean things up a bit and check for validation, I use the following FeatureActivated code block:

public override void FeatureActivated(SPFeatureReceiverProperties properties)
{
    SPWeb oWeb = SPContext.Current.Web;
    SPWebTemplate oWebTemplate = oWeb.GetAvailableWebTemplates(LOCALE_ID)[SITE_TEMPLATE];
    SPWebCollection cWebs = oWeb.Webs;

    SPWeb tWeb = cWebs[SITE_NAME];
    if (!tWeb.Exists)
    {
        SPWeb xWeb = cWebs.Add(SITE_NAME, SITE_TITLE, SITE_DESCRIPTION, LOCALE_ID, oWebTemplate, false, false);
        xWeb.Dispose();
    }
    tWeb.Dispose();
}

Next, code the FeatureDeactivating block:

public override void FeatureDeactivating(SPFeatureReceiverProperties properties)
{
    SPWeb oWeb = SPContext.Current.Web;

    if (oWeb.Webs[SITE_NAME].Exists)
    {
        try
        {
            oWeb.Webs.Delete(SITE_NAME);
        }
        catch (Exception)
        {

            throw;
        }
    }
}

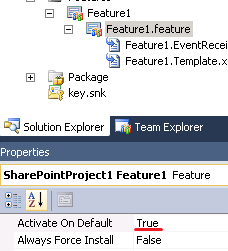
That should do it! Also make sure your feature doesn’t get enabled by default. Double click on the feature file and switch “Activate On Default” to false:

activate feature by default